Pages

Monday, May 28, 2012

never forget today

I just wanted to share a quick card I finished up last night. I fiddled with this card for a few days before it finally came together. I think I'm happy with how it turned out. These papers from Prima are so pretty! I'm sure I'll make a few more cards with all the goodies I have left. I think this card would work well for any special occasion a person might want to remember, but I had Graduation in mind while I was putting it together.
 Supplies used: Patterned Paper: Prima; Cardstock: Bazzill; Flowers: Prima, Kaisercraft; Pearls: Kaisercraft; Sentiment: My Minds Eye; Butterfly: Dollarama; Misc: Doily, Hemp string.
Thanks so much for stopping by,
Your kind comments make my day.
~Becky

Friday, May 25, 2012

CWC Blog-Aversary Blog Hop: Day 6

Welcome to Paper Crafting World and Cooking With Cricut's 2nd Blog-Aversary and our week long celebration! Each day for a whole week (May 19-26) we will be bringing you fabulous projects made by our Design Team members. We have some GREAT blog candy as well as some daily file and graphic give-aways -- so you will definitely want to make PCW-CWC your daily stop every day this week!

Our theme for Saurday (the final day of the hop) is...
And here is what I created! I have been making a lot of pretty girly cards recently so I wanted to make a masculine card this time.
Supplies used: Patterned Papers: Ki Memories; Cardstock: Bazzill; Twine: The Twinery; Star Pin: Little Yellow Bicycle; Stamps: {ippity} by Unity Stamp Co.; Misc: Button
The papers I used for this card are actually from my Halloween stash, but I love the lime green and I thought that these colors would be perfect for a masculine card. I am totally into using the negative space left over from my die cuts these days and I have done it again here.
The stars are cut from Craft Room Basics, the tag is from George and Basic Shapes and the Scalloped edge is from Just Because Cards
Here is a quick screen capture of how I cut out the stars on Cricut Craftroom. I made a rectangle the size I wanted it to be and then layered my stars on top and turned and sized them until I was happy with how they fit. Then I cut that whole bit out at once. I kept the stars to use on another project. Also in this screen shot are the tag and the border I used so you can see what they look like in CCR.

The star pin that I had was yellow and that just didn't go with the colors on my card so I used a Copic marker to color the star...it worked perfectly!

I used this {ippity} stamps set by Unity Stamp Co. for the sentiment on the card. This set is called How YOU Doin'
Thanks for stopping by and make sure you head on over to Cooking With Cricut to check out the rest of the projects by our amazing Design Teams!

I love to read your kind comments!
~Becky

Wednesday, May 23, 2012

CWC Blogaversary Hop: Day 3

Welcome to Paper Crafting World and Cooking With Cricut's 2nd Blog-Aversary and our week long celebration! Each day for a whole week (May 19-26) we will be bringing you fabulous projects made by our Design Team members. We have some GREAT blog candy as well as some daily file and graphic give-aways -- so you will definitely want to make PCW-CWC your daily stop every day this week!

Our theme for today is...
 and this is what I created! What better for a Pinkalicious theme than to make a baby girl card. I scrap lifted this idea from one of my favorite card makers Danni Reid.

Supplies used: Diecut Machine: Cricut Expression; Software: Cricut Craftroom; Patterned Papers: Daisy D's, MME, LYB; Cardstock: Bazzill; Border Sticker: American Crafts; Stamps: Stampin Up; Heart Pin: MME; Twine: The Twinery; Misc: buttons, lace.

I cut the butterfly out on CCR using the Cricut Craftroom Basics digital cartridge. I used the 'negative' space left over once the shape was cut out for this card. I'll use the butterfly on another card soon.

I popped up all of the center portion of the card to give it dimension and so the darker butterfly has some depth to it.

This was a great challenge for me because dug into my pink file I ended up using only scraps to make my card.

I added some more pink details to embellish my card with the bakers twine, a cute button and that sweet little heart pin.

Anyways, now it is your turn! Head on over to Cooking With Cricut and link up your project with today's theme for your chance at becoming our next Top Chef!

Thanks for stopping by and make sure you head on over to Cooking With Cricut to check out the rest of the projects by our amazing Design Teams!

I love to read your kind comments!
~Becky

Thursday, May 10, 2012

So nice to be asked!

A week or so ago I received an email from My Minds Eye asking me if they could feature my Bee Happy layout on their blog for their I Spy with My Minds Eye segment. Wow! Like they even had to ask. Of course I said yes immediately, My Minds Eye is totally my favorite scrapbooking company! 

So today is the day that my layout is featured. If you haven't found your way to my blog from the MME blog, please check out their I Spy feature HERE.

Since I am hopeful that this feature on the My Minds Eye blog might send a few visitors my way today, I wanted to share another layout that I did recently featuring some more lovely MME product; primarily Lost&Found2.

I am finally getting some time in to scrapbook layouts for my son. He is currently 15 months old and only has a handful of layouts in his scrapbook.  This layout is about the first time we met.

I have always wanted to do a 'girly' boy page and this was the perfect opportunity.
 The title: Love at First Sight
 I absolutely looooove this quote! I saw it on Pinterest and knew immediately that I had to do a layout based on it...
 A close up of some embellishments and the little tag with my son's birthday on it.
 I didn't have a big enough heart punch or diecut so I just drew my own.
I used this sketch by Becky Fleck to create this layout.

Thanks so much for stopping by
Your kind comments make my day
~Becky

Monday, May 7, 2012

National Scrapbooking Day

This past weekend was National Scrapbooking Day. I would have liked to spend my whole weekend scrapbooking and taking part in all of the fun challenges going on, but I had other things planned. Luckily for me, many companies have due dates on their challenges that extend up to a week past NSD so I had some time to participate in a few.

My first challenge was with A Cherry on Top. Once of the challenges they posted was to find a project on their Pinterest page that inspired you and to make something from it.

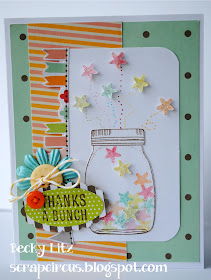
Here is the image I was inspired by. I loved the little butterflies coming out of the jar so I decided to work with that idea...
 This is what I came up with. I used stars instead of hearts. I found that all my ink pads were too dark so to get a softer color I stamped off onto scratch paper once and then stamped my stars.
 I popped up some of the stars in the jar to give them some dimension.
 I popped up all the stars that are jumping out of the jar and added some glitter to give them a little sparkle.
Supplies used: Patterned Papers: American Crafts Dear Lizzy Neopolitan; Stamps: American Crafts; Punches: Stampin Up; Markers: Stampin Up; Glitter: Stickles; Flower: Prima; Twine: Devine Twine; Misc: Buttons, embroidery floss.

My next project is for Unity Stamp's Sketch Challenge. I applied to be on their design team that was just announced on NSD, but I didn't make it :(  My friend Shilo was chosen though so that is REALLY exciting! I'm going to have lots of stamps to borrow from her I guess! LOL, you should check out her blog HERE.

Anyways, the sketch challenge comes with some amazing prizes of it's own. The winner gets to be the Guest Designer in July and $100 worth of Unity Stamps! And you know I LOVES me some Unity stamps!

Here is the sketch...
 And here is what I came up with. I have always liked the play on words to use {son}shine instead of sunshine and now that I have a little boy, I have the opportunity.
Supplies used: Stamps: Unity; Patterned Papers: My Minds Eye; Crate Paper, Prima; Cardstock: Bazzill; Letter Stickers: American Crafts; Twine: Devine Twine; Paper Punches: Tab (Jenni Bowlin) Scallop border (EK Success); Border Sticker: Doodlebug; Misc: buttons, embroidery floss, dimensional adhesive.
Here's a closeup of my embellies...I just love these little clouds.


Here's a quick look at the Unity Stamp sets I used...
Blossom Soup


Fingers crossed that I get picked this time!

My third NSD project was a Becky Fleck Sketch Challenge over at A Cherry on Top. The sketch this time looks like this...

And here is my take on the sketch.
Supplies used: Patterned Papers: My Minds Eye; Journaling card: My Minds Eye; Border Sticker: Simple Stories; Letter Stickers: Cosmo Cricket, American Crafts, Carolee's Creations; Banner Flags: My Minds Eye Die Cuts; Brads: My Minds Eye; Buckle Up Tag: Karen Foster; Twine: Devine Twine, The Twinery; Mics: buttons, Milk Tab.

And here are a few close ups of the details...


Thanks for stopping by,
Your kind comments make my day.
~Becky

Sunday, May 6, 2012

I had to try...

When Paper Smooches put out a call for a new Sparks Challenge Design Team, I decided to throw my hat in the ring. I participate regularly in this challenge so I went back to some of the older challenges to make my cards. In the end they didn't pick me...what were they thinking?! LOL, but I thought I'd make a quick post to show you the cards I made for my application.  Beside each card pic is a pic of the Sparks inspiration image.

For this card I took inspiration from the colors and the apples.
 Supplies used: Stamps: Paper Smooches; Patterned Papers: Jillibean Soup, Crate Paper, Kaisercraft, Pink Paislee; Cardstock: Bazzill; Misc: Buttons, embroidery floss.

I love the placement of the shapes in this photo as well as the colors. Blue and yellow is such a classic color combo. I used the butterflies instead of the ovals in the inspiration photo, but I got the idea for the butterflies from the few tiny butterflies in the frames.
 Supplies used: Stamps: Paper Smooches; Patterned Papers: My Minds Eye, Kaisercraft, Authentique; Cardstock: Bazzill; Butterfly punches: Martha Stewart, Stampin Up.

This inspiration room is SO FUN! I recreated the pink and white polkadot wall by using white embossing powder with the polkadot border stamp by PS. I added the frog like in the photo as well as a little bit of black...every room should have a little black in it. I finished off the card with some glittery brads to mimic the buttons in the headboard.
Supplies used: Stamps: Paper Smooches; Patterned Papers: Best Creation; Cardstock: Bazzill; Embossing Powder: Stampendous; Twine: Devine Twine; Brads: Making Memories; Scallop punch: EK Success; Misc: button, jewels.

I absolutely loooove this inspiration photo! I have always wanted to own a little VW van (maybe not orange) and who wouldn't want to drive through a tree?!?! I used the woodgrain patterned paper to represent the tree, and the orange circles to represent the van. Since the card had a kind of nature theme going on I decided to add this adorable little owl as well.
Supplies used: Stamps: Paper Smooches; Patterned Papers: Crate Paper, My Minds Eye, Pink Paislee; Cardstock: Bazzill, Xpress It; Markers: Copics; Ink: Memento; Die Cuts: Spellbinders.

This is the one card where I included a stamp that wasn't Paper Smooches (maybe that's why they didn't pick me), but I had this flower from my Stampin Up stash that was perfect for this inspiration photo so I had to use it.  This card was inspired by the colors and the flowers in the inspiration photo. This photo isn't very good, but this card turned out to be my favorite of the group. 
Supplies used: Stamps: Paper Smooches (sentiment), Stampin Up (flower); Patterned Paper: My Minds Eye, misc; Ink: Tim Holtz Distress ink; Twine: The Twinery; Misc: button.

thanks for stopping by,
your kind comments make my day
~Becky

Wednesday, May 2, 2012

CWC: Thank a Teacher Challenge

As a certified teacher myself I know exactly what teacher's work with on a daily basis. Times can be tough with large class sizes and insufficient aid for students with special needs. Teacher's go above and beyond the call of duty every day to help our kids to succeed and they deserve everyone's appreciation. That is why I was so excited to participate in this week's challenge at Cooking With Cricut to make a project to show your appreciation for a teacher.

Another thing I know, is that many teacher's do receive a lot of appreciation in the form of gifts from their students and parents. These gifts can certainly add up over the years and while teacher's do cherish these gifts, they begin to take up a lot of room over time. Because of this I like to give my daughter's teachers a gift card so that they can buy a coffee or a dinner out, or a new book; whatever makes them happy and isn't another little apple that says #1 Teacher!

I made up this little card to hold a gift certificate in the pocket on the front. I was inspired by Tessa's card HERE, I hope I did her design justice. I altered the sweet little stickers on her card so that I could use Cricut embellishments instead.
Supplies used: Patterned Papers: Simple Stories; Cardstock: Bazzill; Ruler border: MME; Stamps: Stampin Up, Unity Stamp Co.; Ink: Palette Hybrid; Twine: Devine Twine; Paper Envelope: Devine Twine; Misc: Button, Embroidery floss,
I cut the apple at 5.5" from the Just Because Cards cartridge. Now that probably sounds really big but the apple is made to be a certain scale on the card so I had to make it 5.5" to be big enough for my card. I had to do a few trial cuts with some scrap paper to get it just the right size before I cut it with my red patterned paper. The little lable that is below the apple is cut from the Storybook Cartridge at 2.25".
I hope you will stop by Cooking with Cricut and play along with this week's challenge. Show some appreciation to a teacher you know. They deserve it!

Thanks for stopping by!
Your kind comments make my day.
~Becky