Pages

Sunday, April 29, 2012

MME Sketch Challenge

This past weekend I got a bit of a holiday from Mommy duty. I attended a local crop and a great time giggling with the ladies, and spending my days working on some scrapbook projects.  I have wanted to participate in this month's sketch challenge over at My Minds Eye and I am cutting it pretty close to the due date but I managed to get the layout for it done this weekend.  We were given this sketch to work from...


I followed it pretty literally this time because the Lime Twist papers I had, worked perfectly to go along with this sketch.
Supplies used: Patterned Papers: MME Lime Twist; Chipboard Embellishments: MME Alphabet Soup; Letter Stickers: Jillybean Soup, Simple Stories, Cosmo Cricket, Adornit; Punches: EK Success; Border Stickers: October Afternoon, Crate Paper; Misc: Buttons, sewing machine, embroidery floss
I found this funny little quote on Pinterest and as soon as I saw it I knew I had to make a layout about my son and the two other little boys I look after during the week. Sharing toys is a new lesson for these little ones and they seem to follow this set of rules to a T!!!  I edited the rules a little bit for my layout, but the basic idea is the same.
Here are a few close up images. The title...
my journaling...
 my little chipboard embellishment...

Now I've got to hurry up and get his posted so I can link it up before the challenge closes.

Thanks for stoping by,
It makes my day to read your kind comments.
~Becky

Tuesday, April 24, 2012

My Minds Eye Hexagon Challenge

Hexagons are the biggest trend right now. I haven't had the opportunity to create anything with them yet so when I saw that My Minds Eye had a challenge to use hexagons this month I thought I'd give it a try.

Another big trend I see going on right now is to use the negative space left over when you make cuts on an electronic die cut machine. I have been wanting to try this as well, so I combined the two ideas into my challenge entry.

I didn't come up with this layout entirely on my own. I used a layout by Piradee Talvanna HERE as inspiration.

So with out further ado, here is my layout...


Here are some of the close up details...I added these chipboard bees from My Minds Eye's Alphabet Soup line....The word "happy" was cut from the Lyrical Letters cartridge on my Cricut.

I used a number of My Minds Eye paper lines to get the yellow's blues, and blacks and whites to fill in the hexagon shapes: Andrea Victoria, Miss Caroline Fiddlesticks & Dolled Up, Lost & Found 2 Sunshine, On the Bright Side, and Lime Twist Happy Go Lucky.

The fun brads from the My Minds Eye Lost & Found 2 line Sunshine worked great to add some finishing touches. You can see in this close up the dimension that is created by lifting up the hexagon diecut paper.

The die cut banner and brads and lable came from My Minds Eye as well. The little yellow word stickers are from Cosmo Cricket.


For those of you who might be unsure about how to use the negative space on your electronice die cut machines I thought I would show you how I created this layout.  I used my Cricut machine and Cricut Craftroom online so that I could get my hexigons exactly how I wanted them.  Here is a screen capture of what I did in CCR.

I made an 8x8 inch square for my first layer using the George and Basic Shapes cartridge. For the second layer I added the hexigon shape at 1.5" from Once Upon a Princess. I copied and pasted the shape multiple times and layed the shapes out evenly over the square below. I sent it to cut on my Cricut and made sure to set it to cut all of the layers at the same time.

Here is what my paper looked like once I cut it out.
I added the different patterned papers to the back of this piece and used dimensional adhesives to pop it all up on top of a 10x10" piece of white cardstock and then mounted the whole thing on to the yellow chevron paper. Finally I added the title, photo and embellishments.

I hope you like what you see and maybe learned a little something here today.

It makes my day to read your kind comments

Thanks for stopping by!
~Becky

Monday, April 23, 2012

Authentique Sketch Challenge

I really love using a sketch to get started with my cards or scrapbook pages, and It's fun when a sketch is part of a challenge too! Today I am participating in the Authentique sketch challenge.

Here's their sketch...

When I saw this sketch I knew immediately I wanted to use my Moon Beams and Heart Strings stamp set from {ippity} stamps by Unity, and I finally got a chance to dive into my 6x6 Uncommon paper bundle from Authentique.
Supplies used: Patterned Papers: Authentique Uncommon 6x6 bundle; Cardstock: Bazzill; Stamps: {ippity} by Unity; Bakers Twine: The Twinery; Ink: SU, Palette, Paper Punch: Ek Success; Misc: button, dimensional adhesives.

The stamp is quite large so I didn't really have the room to have the hexagon shapes in the background so I substituted the polka dot paper to mimic that design.
So I added a half a hexagon in the upper left corner to make a tag.
I stamped the hearts onto different papers and fussy cut them out before popping them up with dimensional adhesive.  I finished off the card with a little bakers twine bow and the sweet sentiment.

I really like how it turned out. Thanks so much for stopping by.
I appreciate your kind comments.

~Becky

Sunday, April 22, 2012

CWC Home Decor Blog Hop Day 2!!!

Welcome to Paper Crafting World and Cooking With Cricut’s Home Décor Blog Hop! Our Design Teams are so excited to bring you a two-day hop that focuses on projects for your home – that’s right no cards or scrapbook layouts in this hop!

This is the second stop on today's hop...You should have arrived here from visiting Melin at Paper Crafting World at the beginning of the hop.

Hello, Becky here again. Yesterday I showed you a project for a little boy, if you happened to miss it you can check it out HERE. Today I want to share with you a little project I made for my cousin's little girl.

My cousin Kelly-Ann bought some 5x7 frames from Ikea and asked me to make something sweet for her new baby daughter Madalyn's room.  She wanted me to incorporate the colors pink, green and brown, but she left the rest up to me. So here is what I came up with...


And here are some close ups of each of the panels...

 The elephant is cut from Birthday Bash at 4". The bird and banner are also from Birthday Bash and cut at 2.25". I had to cut the bird with banner twice to get a long enough banner, but I left off the second bird and cut off one of the triangles.

The monkey is cut from Create a Critter at 3.5 The vines are also cut from Create a Critter; the curved vine was cut at 5" and the straight vine was also cut at 5".

The giraffe was cut from Create a Critter at 6.5". I fussy cut the glittery clouds from some patterned paper I had in my stash and I added googly eyes to finish off each of the critters.

Once I was all done I sent these sweet little critters off to my cousin and she got them framed and hung up on the wall. She emailed me this photo of what they look like up...I luvs them!


So there you have it...Thanks so much for stoping by :) I hope you enjoyed my projects this weekend!

I enjoy reading your kind comments :)
~Becky

We hope you’ll link up your Home Décor project for a chance at winning one of our giveaways. One winner will be chosen by random draw and three others will be selected by the Design Team. Head on over to Cooking With Cricut for the guidelines and the link up.

Thanks for stopping by! Head on over and check out what Sharon at Sharon's Crafty Cards has cooked up!

Saturday, April 21, 2012

CWC Home Decor Blog Hop Day 1!!

Welcome to Paper Crafting World and Cooking With Cricut’s Home Décor Blog Hop! Our Design Teams are so excited to bring you a two-day hop that focuses on projects for your home – that’s right no cards or scrapbook layouts in this hop!

You should have arrived here from visiting Michelle at Michelle's Crafty Creations.

If you’ve joined us in mid-Hop and would like to check out all the other fantastic projects head on over Melinda’s Paper Crafting World and start at the beginning.

Hi everyone, thanks so much for stopping by, Becky here with a sweet banner for a little boy's room.  I was given this photo of little Zakk's bedding and asked to make a name banner to coordinate.  This bedroom set is just so sweet, I immediately loved the colors and the precious animals and I had a great time making something special to go in his room.

I used Birthday Bash to create the arrow shaped flags on the banner and cut them at 6". The circles were cut from George and Basic Shapes at 3.25". The font comes from Birthday Bash and was cut at 2.25". All of the animals were cut at various sizes from Create a Critter, except the Elephant who came from Birthday Bash.

I strung the flags onto some 1 inch ribbon and embellished with some buttons. I gave all the critters googly eyes and I think they look super cute! To finish it off I added some little bits of ribbon between each of the flags to add a little whimsy!


Thanks for coming by :) I hope you will come by again tomorrow to see another project that I've got to share with you!

I enjoy reading your kind comments :)
~Becky

We hope you’ll link up your Home Décor project for a chance at winning one of our giveaways. One winner will be chosen by random draw and three others will be selected by the Design Team. Head on over to Cooking With Cricut for the guidelines and the link up.

Thanks for stopping by! Head on over and check out what Jen at Musings of a Crafty Mom has cooked up!

Tuesday, April 17, 2012

Unity KOM Sketch Challenge for April

This month Unity's Kit of the Month sketch challenge is to use this sketch...

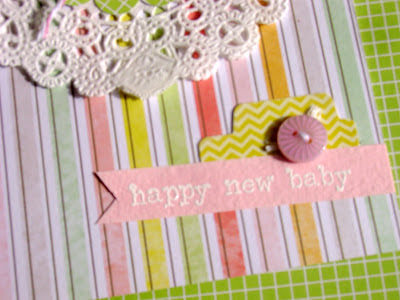
When I saw the scalloped circle at the top of the card I immediately thought about using a doily and the rest of the card just came together from there.
Supplies used: Stamps; Unity; Embossing Powder: Stampendous; Ink: Versamark; Patterned Paper: American Crafts Neopolitan; Cardstock: Bazzill; Paper Punches: Stampin Up, Jenni Bowlin; Twine: Devine Twine; Flower: Prima; Misc: Buttons, embroidery floss, doily.

I used the Happily Ever After Kit from July 2010 for this card.  Along the top I used the hexagon border and stamped it repetedly and embossed it in white to give a subtle texture.

The sentiment "happy new baby" is also from this set.

After I had already finished this card, I realized that is also works with the Unity April Challenge to make a project with Green, Pink and Off White...lucky thing!

Thanks for stopping by! I appreciate your kind comments
~Becky

Friday, April 13, 2012

Paper Smooches SPARKS Challenge

This month's SPARKS challenge over at Paper Smooches stamps is to use this photo from Pinterest as inspiration...
I'm always up for a challenge and Paper Smooches stamps are so fun to use, so of course I'll play along. 

I took my inspiration from the colors, layout and text of this photo and created a card that is totally out of my usual style.

Stamp sets used: Party Posse, Falling For You, Word Salad
I usually use pattern papers and do a lot of layering but this time I kept it simple like the inspiration photo.
My camera is still in the shop so I am stuck using my terrible old point and shoot and no matter how hard I try I just can't get nice photos. It is very frustrating and I CAN'T WAIT to get my camera back!

Thanks for stopping by! I appreciate your kind comments
~Becky

Thursday, April 5, 2012

Scrapbook and Cards Today Sketch Challenge

Scrapbook and Cards Today magazine is 6 years old! WOW! HAPPY BIRTHDAY to THEM! Such a great magazine :)

Becky Fleck put out a challenge to use one of her sketches from the new Scrapbook Pagemaps 2.  I love creating from a sketch so this was a great challenge for me. It is so great to get a place to start from instead of having to design each layout from scratch. Becky Fleck's sketch books are amazing! I have Pagemaps 1 and I'm itching to get #2...maybe i'll win one ;)

Anyways, the sketches are so fabulous, I totally got on a roll and I actually ended up doing TWO layouts!

The first is from page 43 of the new Spring issue of SCT.
And this is my layout...
Supplies used: PATTERNED PAPERS, BRADS, EMBELLISHMENTS: My Minds Eye; LETTER STICKERS: Basic Grey, Adorn-it, Jillibean Soup; PUNCHES: Stampin' Up, Martha Stewart; 

 and a few close ups...


My second layout is from a sketch on pg 44 in the Spring issue.
And here again, is my layout...
Supplies used: PATTERNED PAPERS: My Minds Eye; BRADS, My Minds Eye, FLOWER STICKERS: My Minds Eye; WORD STICKERS: Crate Paper; TITLE STICKERS: "Little" October Afternoon; JOURNALING SPOT: My Minds Eye; PUNCHES: Martha Stewart, Stampin' Up; INK: Tim Holtz Distress Ink;

And here are a few more close ups...


Thanks so much for stopping by, I love to read your kind comments.
~Becky

Tuesday, April 3, 2012

Cooking with Cricut: Easter Challenge


HAPPY EASTER!!!
This week's challenge over at Cooking with Cricut is to create an Easter project with your Cricut.
Here is my take...

Supplies used: Cardstock: Bazzill; Patterned Papers: Crate Paper, Jillibean Soup; Cricut Cartridges: Birthday Bash, Craftroom Basics, Paperdoll Dressup; Flower: Prima, Twine: Devine Twine; Ink: Tim Holtz Distress InkSentiment Font: Wish I Were Taller; Misc: flower, button, toothpick, googly eye.

I created this card in the Cricut Craftroom using a few different cartridges.  The bunny shape card is from the Birthday Bash cartridge.  The scalloped oval and regular oval shapes are from Cricut Craftroom Basics. Finally, the grass is cut from Paper Doll Dress Up.

I used the brown wood grain paper in the hopes that it would make the bunny look like one of those yummy chocolate bunnies you get at Easter time. The googly eye finished it off like the chocolate bunnies.

Here is a peek at the open card...

How about a little tip?: I cut the grass 4 times! twice as a regular cut, and two more times as a "flip" cut.  That way I could glue the grass to either side of the bunny shape so that I could hide the multicolored pattern that is on the back of the green.

I finished off the card with the flowers, twine, button and I fussy cut the little chick out of a piece of patterned paper. The sentiment is printed off of my computer. The font is called Wish I Were Taller. I attached the little sentiment banner to a toothpick.

I hope you will stop by CWC and play along with our challenge. I'd love to see what you come up with!

Thanks for stopping by, I love to read your kind comments
~Becky

Make your own Tissue or Washi Tape

Washi tape, tissue tape, chinese tape, paper tape, or what ever other name you have heard it called is all the rage right now.  It can be a bit pricy to buy rolls of all the different colors and patterns that you love so I'm going to show you how you can make your own!  This is a great way to save some money and also be able to customize your tissue tape to suit your project!

Please excuse the quality of the photos, I know they are not great but my hubby was helping me (bless his heart) AND it was a cloudy day :( but anyways, you get the idea...Let's get started!

Here is what you'll need...
A paper trimmer, scissors, tissue paper (preferably new without wrinkles) a sheet of double sided adhesive (I am using Scor-tape), Ink, and background stamps (Paper Smooches stamps work great for this! I am using Debonair, and Geo-Graphic)

The first step is to cut a single layer of tissue paper so that it is just slightly larger than the adhesive sheet.
Second, peel the backing off of the adhesive sheet.
Take the tissue paper and drape it back on itself with out creasing it.  Line the edge of the tissue up with the edge of the adhesive and attach just the edge.
Now slowly and carefully use your hand to spread the rest of the tissue paper onto the adhesive. Be as careful as you can to not get any wrinkles. If you do that is ok, but try to avoid it.
Once the tissue is totally attached use your finger, and rub over all the little wrinkles to make sure that it is as smooth as possible.
Take you scissors and trim off the excess tissue around the adhesive sheet
Since the tissue tape is now a whole sheet you can use your paper trimmer to cut the tape to the exact width that suits your project!  For my purposes today, I have cut my tissue tape to 0.75".
Ink up your favorite background stamp...
And stamp along your tissue tape.  I find that it works best if you don't have the stamp too 'inky'. The tissue tape can make your image a bit 'fuzzy' if you have too much ink on it so don't use too much ink, and don't hold the stamp down for too long.
and VOILA! you have your very own custom tissue tape! Easy right?!?!

I decided to use the tissue tape I made today to participate in the Paper Smooches SPARKS Challenge.

 For this Sparks challenge we are asked to take inspiration from this photo...
I was having so much fun with the tissue tape I decided to make two cards for this challenge!

With the first card I took inspiration from the theme as well as the colors. I used the tissue tape to make the center of the egg.
Supplies used: STAMPS: Debonair, Geo-Graphic, A Little Lovin sets from Paper Smooches; PATTERNED PAPERS: American Crafts, My Minds Eye; CARDSTOCK: Bazzill; X-Press It blending CS; RIBBON: Renaissance by Design, STICKERS: Cosmo Cricket, ADHESIVE: Scor-tape, Scrapbook Adhesives 3D foam squares; COPICS: C0, C1, R20, R22; INK: Memento Tuxedo black, Palette Hybrid; MISC: Button, Embroidery floss,

For my second card I kept it pretty simple and let the tissue tape speak for itself; just using the colors for inspiration
Supplies used: STAMPS: Debonair, Geo-Graphic and Word Salad from Paper Smooches; CARDSTOCK: Bazill; EMBOSSING FOLDER: Cuttlebug; ADHESIVE: Scor-tape, Scrapbook Adhesives 3D foam squares; INK: Versafine, Palette Hybrid; MISC: Buttons, embroidery floss.

Well, I hope you learned something here today and that maybe you will give this technique a try!

Thanks for stopping by, I love to read your kind comments
~Becky :)