Pages

Showing posts with label Creative Kit. Show all posts

Sunday, March 1, 2015

March kit Sneaks from MCS!!!!

It's SNEAK PEEK time!
We are so excited to reveal the beautiful lineup of kits that we have coming your way for March.
Just a few more days to wait until the reveal on the 5th... and we have something really fun planned that you won't want to miss!
In the meantime, our designers have prepared some sneak peek eye candy for you.
Have a look at our March Main Kit:


Here are a couple of March Main Kit layouts!
by Michelle McDonald

by Brenda Cazes
******************************
Have a look at our March Creative Kit:
and a March Creative Kit layout!
by Christine Meyer
******************************
Next... our March Limited Edition Kit:


and a couple of March Limited Edition Kit layouts!
by Maiko Kosugi

by Michelle McDonald

******************************
Have a look at our March Album Kit:


and a look inside the March Album!

by Angel Rodrigue

******************************
As always, this is only a little sneak peek at what's coming in the March kits. The full kit reveal is coming up on March 5th... be sure to check back then!
Don't forget to reserve your kits.
Please visit MyCreativeScrapbook.com for more information.
See you on the 5th!

Tuesday, January 27, 2015

Meet Cute

Hello!
I'm here with you today to share how I put my 'Meet Cute' layout together.

Do you know what the term 'meet cute' means? Basically it comes from movies or tv and it refers to when two people meet each other in an amusing, crazy or zany way but are ultimately destined to be together in the end.

Now my daughter and my brother did not get off to the best start, but I know that she is going to love her crazy Uncle in the end....maybe he needs to shave the beard! LOL


The 'hello' paper worked perfectly for this layout and was the first piece I just knew I had to use. I wanted the layout to have a bit more of a masculine feel so I kept the pink out of it for the most part.


 One of my favorite patterns for masculine project is wood grain. There was not a lot of wood grain in the kit but I made sure to use every piece I could. The wood grain tag was the main focus but I wanted there to be some more of that pattern in the layout to balance it out. The little strips of wood grain around the layout are actually the back side of one of the barcode strips from the bottom of one of the other patterns. I cut the strip up and tucked the pieces around the layout.

Speaking of barcode strips...one of the other barcode strips had those fun little emoticon faces. I chose one that matched my daughter's face in each photos and added them to each photo.


 I think the placement of the photos and the papers help your eye to travel from the top left of the layout, down to the bottom right. The layout follows the story of the photos.

I made this layout with the January Creative Kit.


 Thanks for stopping by! We'd love to see what you do with your kits on our FB page.

Have a great day
~Becky


Monday, January 5, 2015

MCS January Creative Kit projects.

I'm back to share the fun layouts I made with this month's Creative Kit from My Creative Scrapbook Kit Club.

Check it out!

This month the kit features the Happy Day collection from Pebbles along with a bunch of other fun goodies.

There are a bunch of fun little flags to cut out of one of the patterned papers. When I saw those, I was inspired to create this fun bunting on my layout.


There were so many cute images included in the sticker sheet. The little dog collar worked so perfectly for this layout...


And there were so many fun patterned papers in the kit that I had to use just about all of them together on this one layout! Don't you just love that little bike?


The 'hello' paper in the kit actually inspired this layout. It worked perfectly for these photos of my daughter meeting her Uncle for the first time...She wasn't so sure about his beard! LOL

I also really loved the dark wood accents on this layout...they added a little masculinity.


Make sure you stop by the MCS website to see the three other amazing kits this month as well as to take a peek in the Gallery at what the rest of our super talented design team did with their kits.

~Becky

Tuesday, December 30, 2014

Christmas Cuties

Hi Friends!

I'm here with you today to show you how I put together my Christmas Cuties layout!


I love making grid style layouts! You are able to add more than one photo as well as a bunch of clusters fun embellishments.

I decided on 3 inch squares so that there would be a nice balance of photos, elements and the background behind. I trimmed the photos slightly so that I could add a white mat and make them stand out.

 
So lets start with the top of the layout. I used a diecut bow to make this square into a gift! Afterwards I popped up the small green gift diecut and layered it on top to make it look like a pile of gifts.

When I placed the Christmas tree in the top left square it looked a little to lonely to me, so I added the '25'. The tree has very thin pop dots under it and the '25' has thicker ones so that they are at different heights and create depth.


The title of my layout was pretty easy to come up with...how cute are those kiddos!?!? I wanted a word that would fit nicely in the square and the word 'cuties' worked perfectly with the Thickers. A few holly stickers finished it off.

In the bottom left corner I used pop dots once again behind the wreath sticker (I love for things to pop off the page). I used a piece of ribbon from the kit to make a tiny bow and added it to the bottom of the wreath.

The patterned paper in the middle square was just so cute I didn't want to cover any of it up so I left it as it is.

Finally I took the three ornament die cuts and lined them up along the top of the bottom right square. They looked a bit strange just hanging in space there so I added the 'JOY' stickers and it helped.

Well that's it for me today. I hope you enjoyed seeing how I put my layout together. There are SO MANY awesome stickers and die cuts in this kit I'm sure you could make a layout in the same style as me and use totally different embellies! I'd love to see it! Please make sure you share on our FB page.

Thanks for stopping by today
~Becky

Friday, December 5, 2014

MCS December Creative Kit

Hello Friends!

I was excited to get to play with the Creative Kit this month from My Creative Scrapbook! Check it out! It features the Be Merry collection from American Crafts and comes with all kinds of awesome stickers and die cuts!


I'd like to share a few of the projects I created with my kit...


 All the red and green in this kit is so awesome! It makes the pages come together so easily they practically scrap themselves!

I love the milk and cookie embellishments. They worked perfectly for my pic of my little guy with his goodies for Santa.


All the bits and pieces in this kit were great for this layout. They gave me a lot of variety to add to each box in my grid. I added some pop dots under the embellies to give the layout some depth.


 The gingerbread items in the kit are so cute!


I think my most favorite thing in the whole it was this little elf sticker! That Elf on the Shelf is so popular these days, I know a LOT of you will have a use for him!

oh, and that strip of Santa's in the top left corner of my layout...that's WASHI TAPE!.....love it!


Thanks for stopping by and checking out my projects.

I have a few more to share with you so please check back soon!
And don't forget to check out what the rest of the DT did with their kits in our DT Gallery!

Merry Christmas!
~Becky

Tuesday, October 28, 2014

'Love This' layout tutorial

Hello friends!

Today I would like to share with you how I put together my Love This layout. This layout was made with the October Creative Kit from My Creative Scrapbook and features the super adorable Forest Friends collection from Doodlebug.

I'm not really into the Pocket Style of scrapbooking for the most part, but sometimes the simple style of it appeals to me. Rather than use a page protector with pockets, I just adapted the style to fit on a typical 12x12 page so it would fit in my regular sleeves.


The Jillibean cards in the kit work perfectly for this style of scrapbooking. They are the perfect size.

I layered some patterned papers in the negative spaces on the card to create my title, and then layered the heart sticker over the arrow. Now of course I can't have things too linear or flat so I offset the sticker of the flower on the card and popped it up with a pop dot. I added the little tag of ribbon to add some texture.


I used one of the small flowers from the kit to create an embellishment cluster in the center of the layout. The flowers are actually two layers glued together, but I carefully took the layers apart and used just one flower on this layout. I used the other on a different layout.  I tucked the owl sticker under a button and used a pop dot under the sticker to add a bit more depth and dimension there.


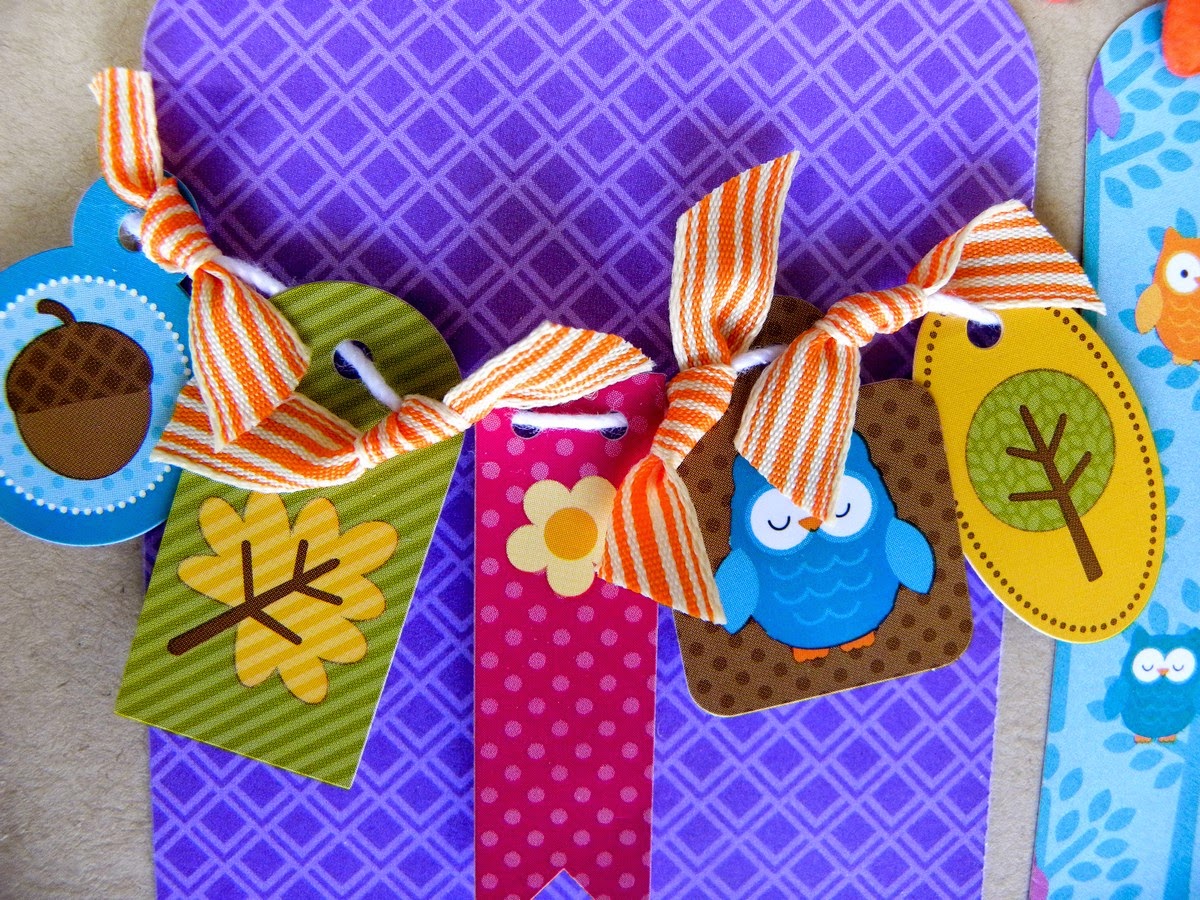
The is my favorite part of my layout. I wrapped a piece of string around the purple card I cut and strung a bunch of the little tag stickers onto the string. I put a pop dot under each (I love pop dots! I can never leave stickers flat). then I tied a little piece of the orange ribbon from the kit in between each of the tags.


..it's super adorable.


Finally I loved the circle/bubble card in the kit so I added it in the last section. I liked how the white cards are on opposite corners of the page. It helps to create balance.

And again, I just can't have things too linear so I offset the cute little owl journaling sticker and added a button for dimension.


So that's it from me today....  
Hope that list gave you some ideas for your next project!
Thanks for stopping in today!
~Becky

Visit my BLOG

Thursday, October 16, 2014

My Creative Sketches October challenge

I played along with the October Sketch Challenge at My Creative Sketches this month!

Here is the sketch I got to play with....


For all the details about this challenge and to see the amazing prize that you could win for participating, hop over to the My Creative Sketches blog.

I can't wait to see how you interpret the sketch :)

~Becky

Thursday, October 9, 2014

October Creative Kit BONUS

Hello friends!

I got to go to a weekend crop just after my kit arrived which was perfect timing to hunker down and focus on getting my projects done.

I was having so much fun with the October Creative kit from My Creative Scrapbook that I even had time to make two cards after I was done with my layouts!

BONUS!!!

so...here they are...

I was pretty happy with how this card turned out. I gave myself a big pat on the back for figuring out how to use the big question mark card that is in the kit.


 I used pop dots to create the dimension under the question mark.


 I love that the little foxes are peeking out. My favorite is the little face peeking out the dot at the bottom of the question mark.

The tiny alpha stickers worked perfectly to create the sentiment on the card.


 My second card is sweet and simple, but I wanted to feature the super cute paper with all the forest critters on it!


It is nice and thin, not too many dimensional objects so it is a great card for sending in the mail.


So there you have it...

To see what the rest of the DT gals created with their kits make sure you check out the GALLERY! Lots of amazing inspiration to be seen there.
And of course if you are interested in subscription info for My Creative Scrapbook kits you can find it all here.
Have a great day
~Becky