Pages

Showing posts with label Studio Calico. Show all posts

Thursday, July 10, 2014

2 Step Stencil Tutorial

Hello Everyone!
Today I want to share how I used the fun two step stencil that is included in the Creative Kit this month.
 
So let's get started!
 
Step 1: Work outside! Just joking, being outside is not necessary for this project but I did because it was a beautiful day. I pulled all my materials outside and sat on my back deck listening to the kids play while I created...perfection!
 
Step 2: tape your white cardstock to the table. I used washi tape because it is sticky enough to hold the paper down but not so sticky that it rips the paper when you remove it.
 
Step 3: I carefully snipped the little icon circles from the stencil because I only wanted to use the circles.
 
Step 4: I didn't want to get any color any place outside my stencil so I used the washi tape again to tape some scraps of paper over my white cardstock.
 
 
Step 5: I wanted to make a rainbow effect so I selected my colours of Distress Ink. I started at the top with the red and used my foam applicator to rub it half way into first row of circles in the stencil.
 
 
Step 6: I used a bright pink to fill in the bottom half of the first row of circles, and then kept going with the pink ink to fill in the top half of the second row of circles.
 
 
Step 7: continue down the rows applying the ink in rainbow order
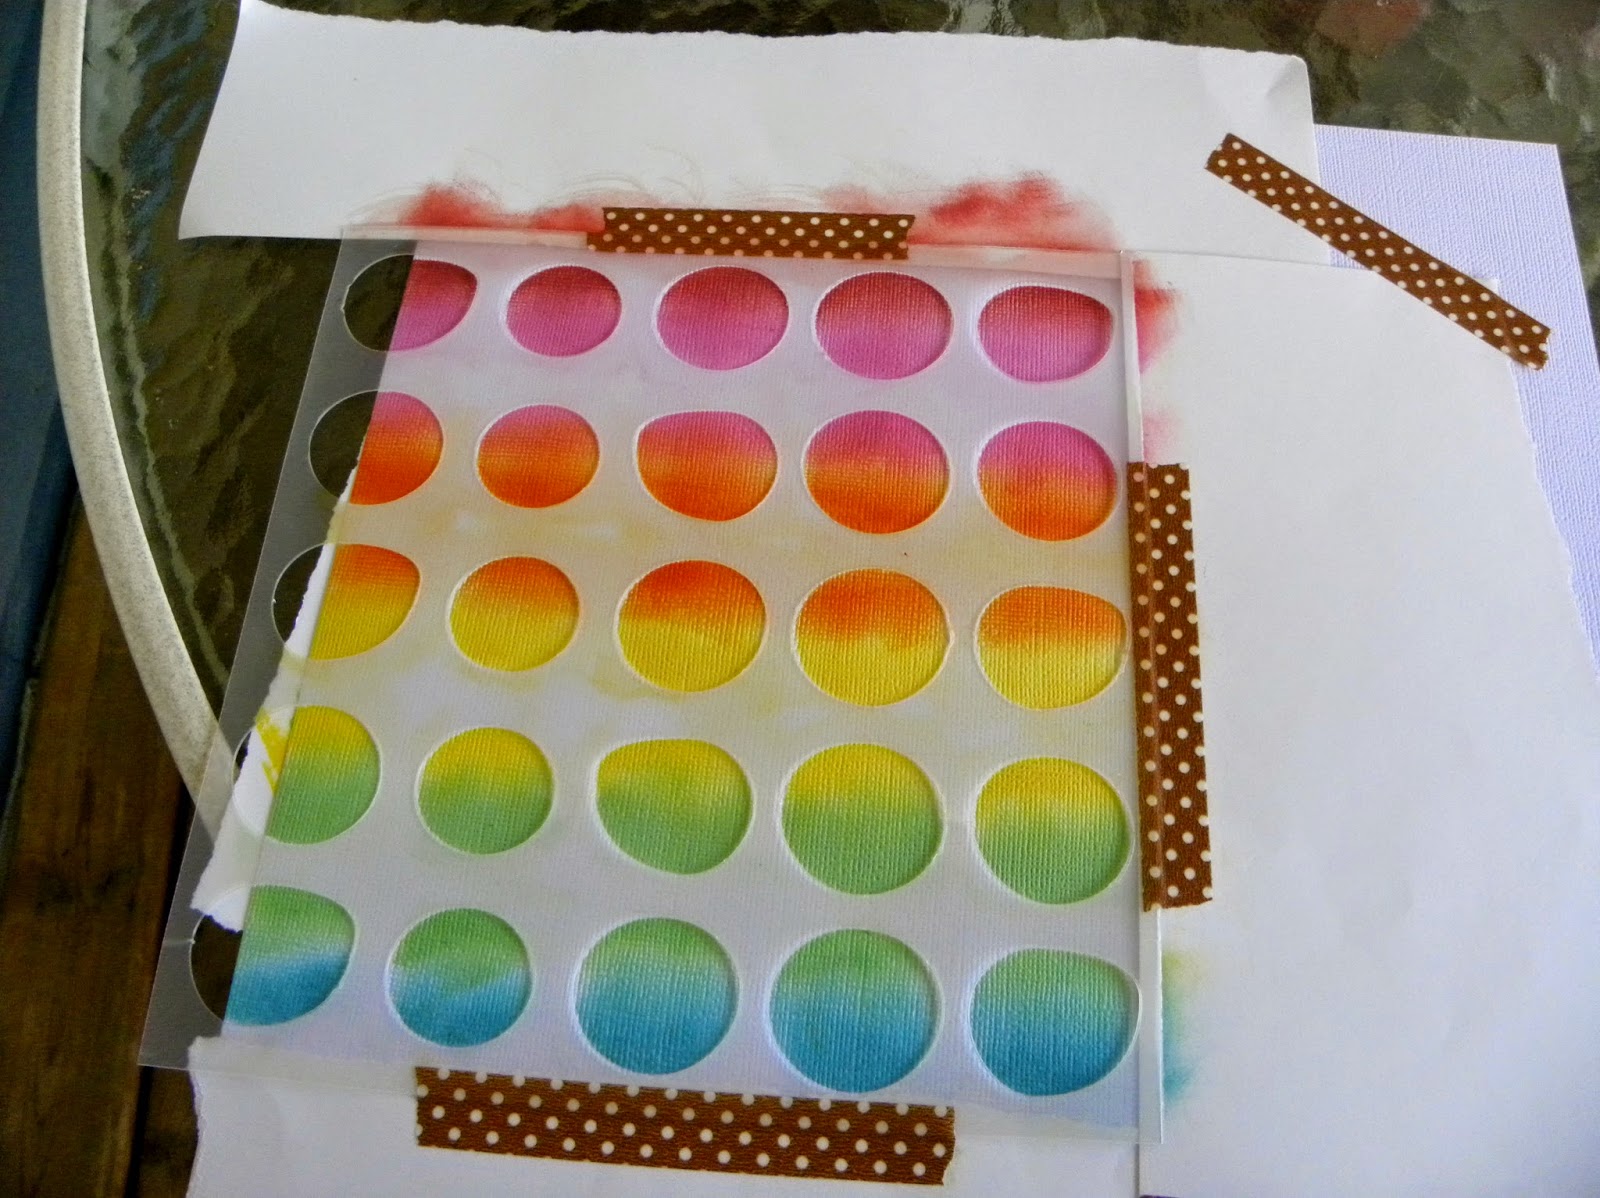
 
 
Step 8: when you have the ink as you want it remove the stencil from the paper.
 
 
Step nine: I took two of the little stencil icons that I had previously removed (the word 'love' and the little star) and I placed them back onto my rainbow circles. I did one close up spray of an opaque white mist over each icon. This muted the ink color a bit on some of the surrounding circles, but I liked the look.


Step 10: Build your layout on top of your stenciled paper! here's what I did with mine...

 
How do you think you'll use the stencil in your kit? I'd love to see!!!
 
Thanks for stopping by,
 ~Becky


Wednesday, July 9, 2014

MCS: July Creative Kit projects Part 2

Hello!
 
I'm back today to share with you the rest of the layouts I created with the July Creative kit from My Creative Scrapbook kit club.
 
First up this layout of my daughter.
 
I love this look of making four separate quadrants on a layout
 
 
I used the ampersand to create my title. I just added some of the fun alpha stickers.

 
I cut one of the wood veneer frames in half and tucked each half behind one of my quadrants.
 
one here, layered with some papers and stickers...

 
 and one here with some more layering...
 
 
There are so many fun icon and word stickers in this kit that it makes it super easy to add a bunch of fun details to all your layouts. I used a tonne of them and I still have a bunch left


***
 
On my next layout I featured the fun Studio Calico stencil that is in the kit.
 
 
If you are interested in how I achieved my look with the stencil check back soon for a fun tutorial!

 
For the rest of the layout I layered up some more of the fun stickers that come in the kit.
 
and here are a few close ups...


Thanks for coming by today!
 
For information about our kits, visit HERE. And to see what the DT did this time, go visit our GALLERY. You're sure to be inspired. 
 
~Becky

Monday, July 7, 2014

MCS July Creative Kit projects-Part 1

Welcome!
If you are familiar with my blog you will probably know by know that I love bright colors and bold patterns in my layouts. So the July Creative kit from My Creative Scrapbook was perfect for me!
 
This kit features the DIY collection from Simple Stories, and some fun wood veneer shapes and a stencil from Studio Calico.
 
This month fellow MCS DT member Sandi Clarkson and I had a little fun by swapping photos and scrapbooking two layouts for each other. She works with the Limited Edition kit and I just adore her shabby chic style, I just don't know how to do it myself so the trade was the perfect idea.
 
Today I want to share with you the two layouts I made for Sandi.
 
The photos on both layouts by Magnolia Adams Photography were so gorgeous I decided to print them in a large format to make them the focus.
 
 
I layered one of the fun sentiment stickers on top of a wood veneer.

 
There are so many awesome word and sentiment stickers in this kit! I made a cluster of them to create a focal point in the bottom right corner of the layout.

 
This little man who is about to become a big brother had the sweetest smile on his face I just had to frame it!
 
There was a large blank space in the photo above the boys head so I placed the alpha stickers directly onto the photo to create my title.

 
***
 
My second layout for Sandi just focused on the beautiful shot of Mom and Dad.
 
 
I love this little cluster of words! It is placed just at her baby bump in the photo ;)
 
 
That layer of scalloped black ribbon is the edge of the ribbon that comes in the kit, I just tucked it under my papers so that only the lacey edge shows.
 
I layered some stickers and papers with the wood veneer....

 
and created a title by adding alpha stickers to the large ampersand piece.


Thanks for coming by today! I'll be back in a few days with a couple more layouts! 

For information about our kits, visit HERE. And to see what the DT did this time, go visit our GALLERY. You're sure to be inspired. 
 
Also, If you want to see what Sandi did with my photos, head on over to her blog here.
 
~Becky

Friday, August 16, 2013

MCS: August Sketch Challenge

The August Sketch challenge begins today over at My Creative Sketches.
 
Here is the layout I made based on Liz's fun sketch below. I liked all the white space on the sketch so I kept with that on my layout.
 
I used some papers from Echo Park and Bella Blvd, wood veneers from Studio Calico, enamel dots from My Minds Eye, and Stickers from Echo Park
 
 
This is the sketch we are playing along with this month...
 
 
Here are a few close ups of the details on my layout....


The story that goes along with this layout is a bit long and I didn't want to have all the writing take over the page so I wrote all my journaling out on a tag and tucked it behind the photo with a little pull tab.


I hope you will consider playing along with our challenge this month. If you do you'll have the chance to win this fabulous prize that Pam has put together!
 
And don't forget MCS has an awesome monthly KIT CLUB as well, and you can see past kits as well as how to join up right here.
 
Have a great day :)
~Becky